Demystifying Trusted Platform Modules, Part 5
This is part 5 of a 6-part series on Trusted Platform Modules. If you missed the earlier parts, be sure to check those out first!
Summit Embedded Blog: TPM Series
Generate a Device Identity Certificate (this post)
Sign Data With A Certificate
In the previous part 4 of our “Demystifying Trusted Platform Modules” series, we learned how to generate a private key and use it to perform a cryptographic operation. However unique, device-specific keys are of limited use on their own. These keys can be used to encrypt & decrypt information locally (like sensitive application data on a local disk). But the plain key contains no information about what our device is, who made it, or who owns it. Thus, we must store additional info in the TPM to make it useful for communication with external devices.
The real power of a TPM comes when you wrap an x509 certificate around the device key, and sign it with a second key linked to your company. That’s what we’ll do today. But first, grab a fresh cup of coffee because this will be the longest post in our TPM series.
Why Do We Need a Device Certificate?
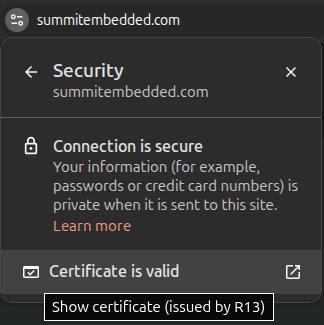
For those that aren't familiar with a Certificate Signing Request, it's a standard way to get your certificate signed or endorsed by another entity. The classic example is for a website's TLS certificate. A website owner can create a private key and a certificate to host on their website, say summitembedded.com, to prove that they own Summit Embedded. But anyone can create a random key & certificate with the name "summitembedded.com" on it. That doesn't prove ownership.
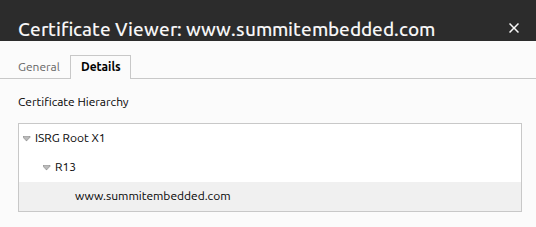
So we had our summitembedded.com website certificate signed by a trusted 3rd party: the Let's Encrypt Certificate Authority. Users of summitembedded.com can trust that the certificate authority did some investigation of the person making the signing request to ensure they really do represent Summit Embedded. In your browser's certificate viewer, you can see this hierarchy. "ISRG" is the Internet Security Research Group that operates Let's Encrypt:
To get the certificate authority to sign Summit's certificate, we couldn't send them our private key. Instead, we used our private key locally to sign a Certificate Signing Request (CSR). It's basically a full certificate, signed by Summit Embedded. But it doesn't truly become a usable certificate until Let's Encrypt countersigns it. We sent the CSR to the Certificate Authority, who also can't share their private key with us. They signed it locally on their end, and returned the public data to us. Now we have a certificate signed by two key pairs, with both public (but not private) keys available to validate the signatures.
Let's switch gears from websites back to embedded devices. Rather than prove who made a website, we want to prove who manufactured a device. We'll create an example Summit Embedded Certificate Authority (CA). The CA certificate's public info would be posted on Summit Embedded's website. This CA certificate's private key would live on a hardware security token within the manufacturing facility. It will countersign the unique certificate of each device leaving the factory. Later on, users of devices can compare the signer of that device's unique certificate with the public CA data on Summit Embedded's website. If they match, the user knows the device was manufactured by Summit Embedded.
Why is this needed?
This is a complex setup. Why do we need it? Embedded devices typically run one purpose-built application. Examples include controlling a motor, or opening a vault door, or displaying the status of a machine, etc. The main use-case for this TPM setup is so we can code this purpose-built application to go into a "disabled mode" if an attacker tries to run it on unauthentic, copy-cat hardware.
Device certificates also give the end-user some peace of mind that their device was truly manufactured by who they think it was. When paired with other features like secure boot, it gives the end user more confidence that the device doesn't have low-level malware running on it.
Setup Tools
First, you'll want to install XCA. Download and install from their website: https://www.hohnstaedt.de/xca/. It's the preferred certificate management tool of Summit Embedded. Most TPM tutorials use raw openssl commands on the command line. The drawbacks of openssl commands are:
Openssl commands have hundreds of characters
Openssl arguments are not intuitve and very hard to remember
Openssl commands require many files that are only slightly different in name, easy to confuse, and hard to inspect (unless you inspect with even more openssl commands).
Openssl error messaging is not descriptive at all
If we want to "demystify" TPMs, we need a GUI. And this GUI is cross-platform. It even supports Wayland-based Linux distros. And it supports Windows for those that haven't yet switched to Linux.
XCA also supports hardware tokens (like Yubikeys, Nitrokeys, and the TPMs that we're working with right now!). Simply install the token's "PKCS#11 Provider" library and you can now use a graphical interface to sign data with hardware tokens. Contact Summit Embedded for setup details.
However, we do still have many openssl commands in the tutorial below. XCA is capable of doing every TPM operation on your embedded device... but your embedded device may not have a display! So we'll use XCA when working with the "signing-server-side" operations. We'll run commands via SSH when working with "device-side" operations.
Certificate Authority Setup
In production, the private key for your Certificate Authority should be kept very secure. It's the root of trust for all the applications running on your devices. The best solution is a full HSM server, such as KeyFactor's EJCBA Server. But that is expensive and complex to set up. For smaller-scale production, a simple hardware security token may suffice. Summit Embbeded supports a variety of tokens, including Yubikeys and Nitrokeys. For help determining the best PKI structure for your application, contact Summit Embedded. And subscribe to this blog for a future post about Yuibkey CA setup.
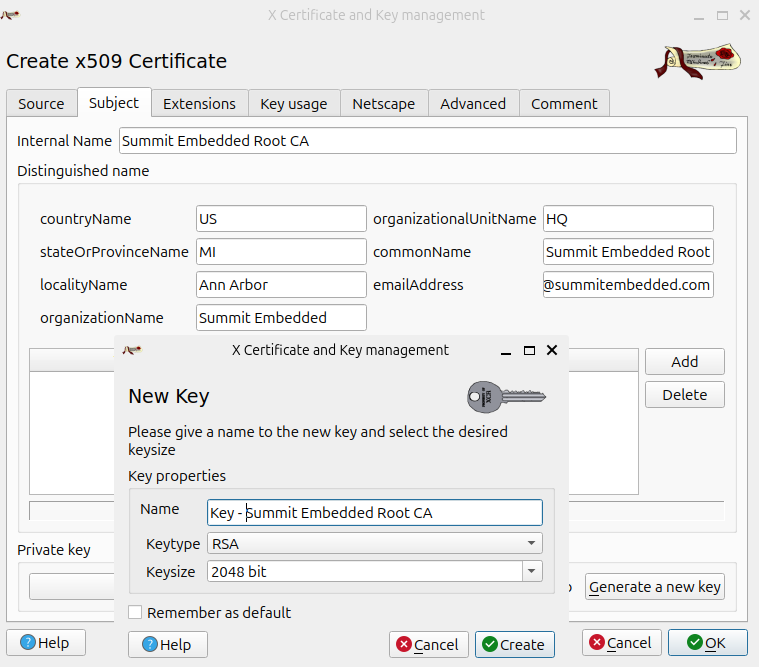
For this example, we'll keep it simple and generate a software key for our CA. Do NOT do this in a production environment. In XCA, select "New Certificate" on the "Certificates" tab. Fill out the information for your CA, like location and contact email. Use the "Generate a new key" button to create a software-based key (which shall not be used in production):
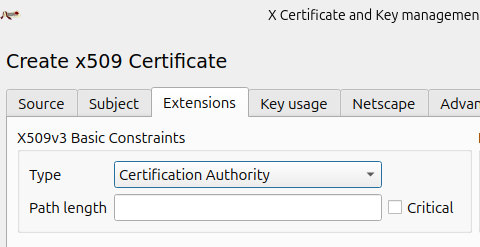
Also, be sure to set the "Extentions tab->X509v3 Basic Constraints section->Type field" to "Certification Authority". A "Certification Authority" has the rights to sign other certificates. We want our CA to have this ability.
Note: we do NOT want our device certificates to be marked as a "Certification Authority" because we still ship that private key and certificate to customers. While customer can't extract the private key from the TPM, they can use the TPM to sign data with that private key. If the device certificate had "Certification Authority" rights, a customer could use these tpm2_* commands on their device to endorse any other certificate on behalf of our company's CA. In short, keys to certificates with this "Certification Authority" field cannot leave the factory!
Be sure to set the expriation date pretty far into the future (100 years is common). For website TLS certificates, the expriation date is often less than 1 year. But those web servers are always online. Their administrators can easily push updated certificates each year. Embedded devices may go decades without connecting to the internet. Set this to a large enough value that the certificate will essentially never expire. Often, device-verification applications ignore this field anyway.
Lastly, your production setup should use something called an Intermediate CA. But that is beyond the scope of this example.
Certificate Process Overview
The instructions below will cover these high-level steps:
Verify that the TPM "engine" software library is in your device image
Generate a Certificate Signing Request (signed by the private key in your TPM)
Sign the CSR with your Certificate Authority
Optional: Visualize the certificate chain in XCA
Upload the signed certificate to the TPM
Optional: Validate your certificate against the CA certificate, simulating what an end-user application will do in the field.
Command Summary
For quick reference, this is a summary of the commands we'll run. We will go into more detail below.
On device: generate CSR
openssl engine -t -c tpm2tss; # verify libraries are present
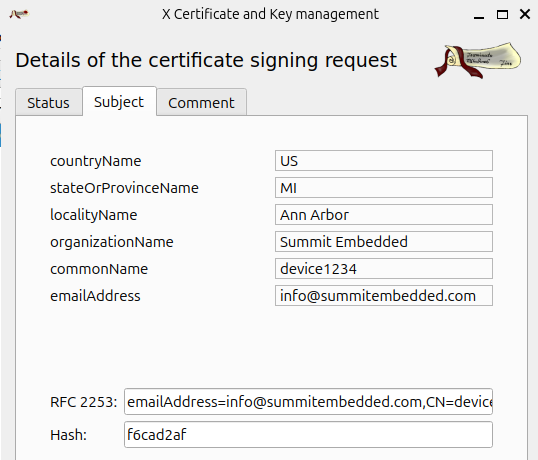
openssl req -new -engine tpm2tss -keyform engine -key 0x81000002 -out device1234.csr -subj "/C=US/ST=MI/L=Ann Arbor/O=Summit Embedded/CN=device1234/emailAddress=info@summitembedded.com";
scp device1234.csr <serverUser>@<serverIP>:/tmp;
On the manufacturing/signing server: sign the CSR
openssl x509 -req -in /tmp/device1234.csr -CA myRootCA.cer -CAkey myRootCAKey.pem -out /tmp/device1234.cer -days 36500 -CAcreateserial; # or use XCA grahphical user interface
scp device1234.cer <deviceUser>@<deviceIP>:/tmp;
On device: install signed cert into TPM NVRAM
tpm2_nvdefine 0x01000000 --size $(ls -l /tmp/device1234.cer | awk '{print $5}') --attributes "ownerwrite|ownerread|authwrite";
tpm2_nvwrite 0x01000000 --input /tmp/device1234.cer;
In the field: verify the certificate
certPubkey=$(tpm2_nvread 0x01000000 -C o | openssl x509 -inform der -pubkey -noout);
tpmIdentPubkey=$(openssl pkey -engine tpm2tss -inform engine -in 0x81000002 -pubin -passin pass:"");
diff <(echo "$certPubkey") <(echo "$tpmIdentPubkey"); # verify 0 return code (no error)
tpm2_nvread 0x01000000 -C o | openssl verify -CAfile myRootCA.cer; # verify 0 return code (no error)
Verify that the TPM "engine" software library is in your device image
tpm2_* commands are great for managing keys in the TPM, but they are lacking when it comes to "PKCS#11", which is the protocol used to work with certificates. In addition to private and public keys, certificates also have a layer of metadata. This metadata includes info as the coppany name, location, and signatures from a Certificate Authority that has signed the rest of the certificate's metadata and public key. tpm2_* commands can do this, but they are poorly documented.
Openssl, on the other hand, is very well supported and documented. Openssl can use keys from a TPM. You just need something called an "engine" (similar to a plugin) to tell openssl how to interface with the TPM. This is because the TPM doesn't just send the private key to openssl to use. The private key never leaves the TPM. So openssl must know how to package a signing request, send it to the TPM via SPI, and parse the response. There are a few different TPM engines. We'll use the "tpm2tss" engine here.
Run the following command to ensure the tpm2tss engine is installed in your device image:
openssl engine -t -c tpm2tss; # This gets the engine info (and ensures it's installed)
openssl rand -engine tpm2tss -hex 10; # This is not required, but is kind of fun. It simply gets 10 random bytes from the TPM.
If the above commands fail, return to Part 1 of this blog series to 1) ensure your device image has the tpm2tss libraries installed, and 2) ensure that your user is in the tss linux group so that you don't need to use sudo.
Generate a Certificate Signing Request (signed by the private key in your TPM)
In the previous blog post, we created a unique device-identity key and stored it in the persistent handle 0x81000002. Let's use that private key to generate a CSR with our device's info:
openssl req -new -engine tpm2tss -keyform engine -key 0x81000002 -out device1234.csr -subj "/C=US/ST=MI/L=Ann Arbor/O=Summit Embedded/CN=device1234/emailAddress=info@summitembedded.com";
Some notes about this command:
`req -new` creates a new Certificate Signing Request (CSR).
`-engine tpm2tss -keyform engine` tells openssl that the private key is not in a file, but in a hardware security token and that it must use `/usr/lib/engines-3/tpm2tss.so` to interface with that token.
`-key 0x81000002` is the key we've selected for signing the CSR.
`-out device1234.csr` is the file name. This is only a temporary file
1234 is the device serial in this example.
`-subj "..."` is the data that users will see regarding your device. Options are:
`C`: Country (e.g., `C=US`)
`ST`: State or Province (e.g., `ST=MI`)
`L`: Locality (city, e.g., `L=Ann Arbor`)
`O`: Organization (e.g., `O=Summit Embedded`)
`OU`: Organizational Unit (e.g., `OU=Engineering`)
`CN`: Common Name (e.g., `CN=device1234`)
This is the "actual name" of this device's certificate.
`emailAddress`: Email (e.g., `emailAddress=info@summitembedded.com`)
The above command will prompt you with "Enter password for user key:". This is the password we set for the 0x81000002 key in the last blog post's tpm2_create command's -p argument. We used "oEncPass" in this example, but you can use a different password if you'd like.
You can also include the key's password in the openssl command directly with `-passin pass:oEncPass` as long as you understand the security implications. An attacker could see this in plaintext in the scripts or the bash history on the device running this command. It's more secure to keep that password in a printed work instruction for the person operating the manufacturing line. However, the `tpm2_create` command in the last blog post already exposed the password on the command line. To prevent this, a more advanced TPM feature called Platform Control Registers. That's outside the scope of this blog series.
On the topic of security, now is a good time to clear the bash_history that was tracking any TPM passwords using `rm ~/.bash_history`. Don't ship your device with this information in ~/.bash_history.
Sign the CSR with your Certificate Authority
Next, send the created file (device1234.csr) to your certificate authority. In the case of website TLS certificates, you would email it to the 3rd-party CA company. In the case of device certificates, you'll ssh it to your factory's signing server with
scp device1234.csr <serverUser>@<serverIP>:/tmp.
Once on the signing server, import the /tmp/device1234.csr request with XCA. You'll see the information we entered in the -subj argument:
Go to XCA's "Certificates tab -> New Certificate button":
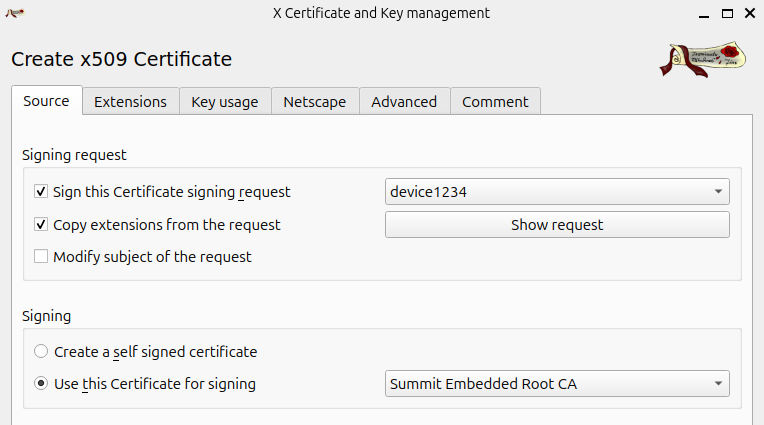
Select the CSR to use for this device. And select your root CA as the "Cerificate for signing". In the "Extensions" tab, select a 100-year expriation date. And set the "Extentions tab->X509v3 Basic Constraints section->Type field" to "End User".
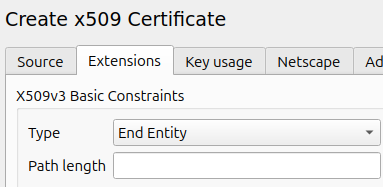
As mentioned above, do NOT give "Certification Authority" rights to this certificate, else customers can use it to sign other certs on your behalf.
Lastly, these graphical steps can be automated in production by using openssl commands on a provisioning server. Contact Summit Embedded for help in configuring this process.
Optional: Visualize the certificate chain in XCA
This step is not required, but is very helpful to visualize the hierarchy of the certificate chain that we created. This is the main reason we used XCA for thus tutorial, as opposed to openssl commands.
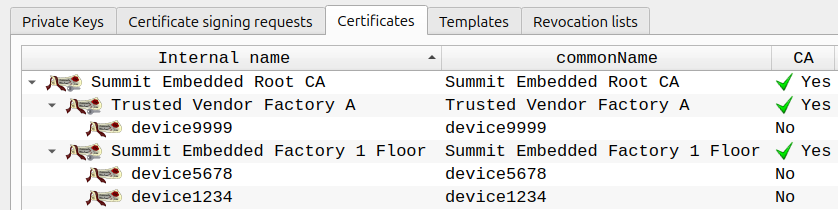
Here's the certificate hierarchy we just created:

The above is helpful for an example, but not quite ready for production. Below is a more refined certificate hierarchy:
Can you create this new hierarchy using the methods we learned above?
This new hierarchy uses Intermediate Certificates. This is helpful if multiple factories are producing devices that require our CA. Those "sub-CA's" for each factory can use separate hardware tokens in each of their provisioning servers. While no one can extract the sub-CA private key from a properly configured hardware token, a rogue employee could always use that token to sign unauthorized devices. A company can contain such leaks using a process called "revocation". Revoking certificates is a pain and should be avoided. But it's much easier to revoke a certificate for one factory as opposed to all of your factories!
In production, using a "Timestamp Authority" at manufacture-time also simplifies the revocation process in the future. Contact Summit Embedded for help in configuring this process.
Upload the signed certificate to the TPM
We're in the home strech. Hopefully there is still a little coffee left in that cup you grabbed at the start of all this.
Select the newly-signed device certificate in XCA and click "Export". Select the "DER (*.cer)" file format option. The SLB9670 only allows up to 2048 bytes of NVRAM to be allocated to a single handle (and only about 6,800 bytes total!). A single DER-formatted certificate is about 1,000 bytes.
Next, send the exported file to your device. You could copy via a USB drive, or ssh with something like `scp device1234.cer <deviceUser>@<deviceIP>:/tmp`.
The above scp command was run from your manufacturing server. Now switch back to the device's command line and run the following:
tpm2_nvdefine 0x01000000 --size $(ls -l /tmp/device1234.cer | awk '{print $5}') --attributes "ownerwrite|ownerread|authwrite";This allocates the NVRAM space, assigns handle 0x01000000, and sets the permissions
tpm2_nvwrite 0x01000000 --input /tmp/device1234.cer;This stores the certificate in NVRAM.
Optional: confirm the certificate was written with `tpm2_nvread 0x01000000 -C o | openssl x509 -inform der -text`. This will print the information you entered into the certificate via the CSR.
Validate the certificate at runtime
This is the code your application will run to ensure the device is authentic and provision by your certificate authority. You'll see reference to a "myRootCA.cer" certificate in the commands below. This is the root CA we discussed above in the section "Certificate Authority Setup" above. Your application must proide this when verifying the device. You'll hardcode your root CA certificate (or chain of CA's) into your application when you build it. You will code your application such that it won't run unless the below checks pass, indicating the device's certificate was properly signed by your unique root Certificate Authority (which has a private key stored in a hardware token within your manufacturing facility).
As mentioned in Part 1 of this series, we’ll be using Linux shell commands for this example. That is the easiest way to experiment and get familiar. For a production application, there are libraries in C, Python, etc that can replace these shell commands.
Verification consists of two parts:
First, you verify the device certificate was signed by this TPM. Without this check, an attacker could buy one of your devices and extract the public data from it's signed certificate. Then they could "clone" your devices by putting the same certificate into the NVRAM of other TPM chips. This prevents such an attacke because each TPM key (which we generated at handle 0x81000002) is unique. Always remember: attackers cannot copy a TPM's private keys, but they can copy a TPM's public keys & certs.
certPubkey=$(tpm2_nvread 0x01000000 -C o | openssl x509 -inform der -pubkey -noout);
tpmIdentPubkey=$(openssl pkey -engine tpm2tss -inform engine -in 0x81000002 -pubin -passin pass:"");
diff <(echo "$certPubkey") <(echo "$tpmIdentPubkey");
This should print no differences and return a 0 return code if the keys match. This proves the public key in the device certificate matches the public key of the secret pair stored in the TPM at 0x81000002.
Second, you must validate that the device certificate was signed by your root Certificate Authority. Without this check, an attacker could follow this blog post to make a new key & device certificate. The only part of this blog an attacker can't duplicate is signing with your unique root Certificate Authority (which has a private key stored in a hardware token within your manufacturing facility).
tpm2_nvread 0x01000000 -C o | openssl verify -CAfile myRootCA.cer;
It should simply print "stdin: OK" with a 0 return code. This means that the certifcate (stored at 0x01000000) was signed by the private key corresponding to myRootCA.cer's public key.
The above command works for device certificates signed directly by the root CA. If you'd like to use intermediate CA's (which we strongly recommend), please contact Summit Embedded for help with that configuration.
That’s it for provisioning a device with a fully-signed certificate. Stay tuned for the last part of our TPM Blog Series, where we will cover one more common use-case for TPM’s: signing files & data - Part 6 - Sign Data With A Certificate